You are in the car returning home from work, and you can’t stop thinking about the new strategy you will use in today’s gaming session.
So, you get home, throw everything aside really quickly and push the turn-on button of your computer.
But just as it boots up, your monitor stays dark, and when you glance inside your case, you see an LED light glowing on the motherboard.
At this point, you’re probably thinking, What’s going on? I just wanted to blow off some steam and play my game, and now my computer won’t even work?
Start by taking a deep breath and stay calm.
That LED light is called the VGA light, and it’s there to signal an issue with your GPU.
If you want to find out exactly what this light means and how to troubleshoot and fix the issue with ease, keep reading.
What is the VGA light on Motherboard?
Modern motherboards have LED lights to alert you if there’s a problem with your computer parts or the motherboard itself. Older motherboards only had one light, making troubleshooting harder.
Typically, there are three LED lights: the VGA light, the RAM light, and the CPU light. Each of these corresponds to a specific issue.
The CPU light indicates a problem with your processor, the RAM light signals an issue with your memory, and the VGA light activates when there’s a problem with your graphics card.
But what the VGA light is trying to tell you?
What the VGA light is trying to tell you is that your motherboard, for some reason, can’t find the GPU, which means that it could be some kind of connection issue or even an issue with the graphics card itself.
So now that we have covered the basics of VGA lights, let’s see what you should do when encountering this issue.
Related Article: “Red Light On Motherboard“
How to Fix the VGA Light on Motherboard?
As already mentioned, when the VGA light is blinking, your motherboard can’t find the graphics card.
There are many reasons why this could be happening, so let’s see what you can do to find what is wrong and fix it.
1. Check the Graphics Card Connection
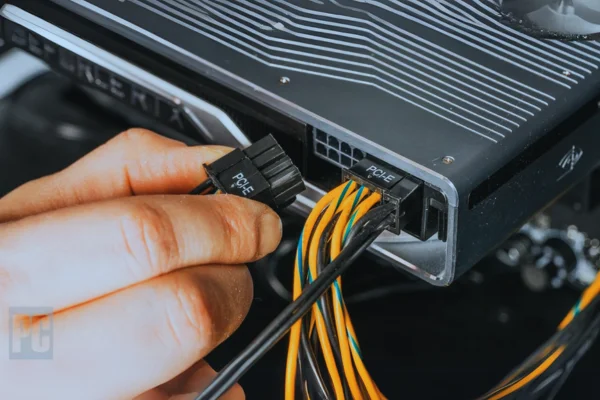
I highly recommend starting by checking if the graphics card is properly connected to the PCIe slot. You should do this first because it is the easiest thing to do and one of the most common reasons that could be causing the VGA light to turn on. So try to move it a bit and see if it is loose; to be 100% sure, unplug it and plug it back in.
2. Check the PCIe Cable
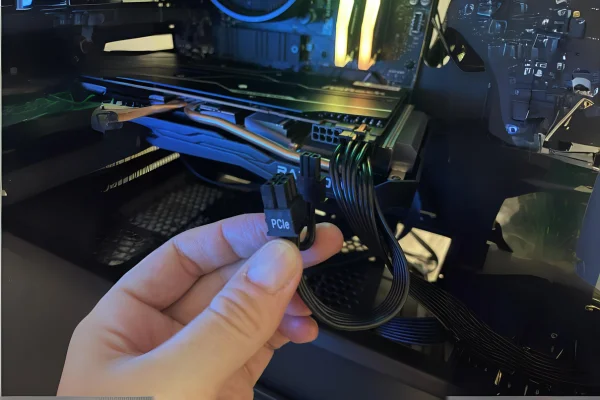
Most modern GPUs need more power than the PCIe slot can provide, and for this reason, you have to also plug a PCIe cable from the PSU into the graphics card. If this cable is not properly connected, the GPU won’t get the power it needs, and it will cause the VGA light to go on.
So unplug and plug this cable to be sure it is connected properly. If, after doing that, the VGA light is still on, try another PCIe cable to be 100% sure that it is not the problem.
3. Check if the PCIe Slot is Damaged
Even though it is not that common for PCIe slots to get damaged, it is still possible. The most accurate way of checking if there is a problem with the PCIe slot is by using a PCIe test card which is a card that you plug into the PCIe slot, and depending on the error code it displays, you know if and what is wrong with your slot.

But while it is the easiest and most accurate way to see if the PCIe slot is damaged, I am sure that most of you don’t have a PCIe test card around so let’s see how to do it without one.
To see if the PCIe slot is damaged, take out the graphics card and carefully check for any issues. This is a pretty standard step, but to be honest, it won’t help a lot. If you want to be sure that it is not a slot problem, the best thing to do is to plug the dedicated graphics card into another slot. If it works fine, the problem is with your original PCIe slot; if it doesn’t, you should keep troubleshooting.
4. Check if the GPU is Dead
The first thing to do, as you did with the PCIe slot, is to inspect the GPU for physical damage. If you don’t see any, plug it again into the PCIe slot and see if the graphics card fan is spinning. If it doesn’t, there is a good chance that your graphics card is dead.
But the best way of determining if your GPU is dead is to call a friend or family member and ask them if you can test your GPU on their PC and vice versa. If your GPU doesn’t work on either of the computers and your friend’s GPU works on both computers, then you can be 100% sure that your GPU is indeed dead
5. Check the PSU
I left this for the end, as it is not that common. If the power supply unit (PSU) is not powerful enough to provide the required power to both the motherboard and the graphics card at the same time, it won’t be able to power up your graphics card and cause the VGA red light to turn on.
So if you have recently upgraded your GPU or another component, you need to make sure that your PSU has enough power to support it. You can do this by using an online calculator like this one.
6. GPU Compatibility
You should be concerned about GPU and motherboard compatibility only if you have recently replaced/ upgraded your GPU or motherboard. If this is the case, you need to make sure that they are compatible with each other.
The best way to do that is by checking both their specifications on their manufacturers’ websites.
7. Reset/Update BIOS
BIOS reset button on the motherboard
Now that you have checked all the possible hardware problems, it is time to check if there is a software issue causing the blinking red light. And when I am talking about software, I am talking about the BIOS.
The BIOS is responsible for the hardware settings of your PC, and if it is corrupted or not properly configured, it can cause all sorts of problems. So before you do anything else, you need to reset the BIOS to its default settings.
There are many ways to do that, from removing the CMOS battery to using a jumper. To learn more about it, you can read my article named: “How to Reset Your CMOS [Motherboard]“
If, after resetting the BIOS, the problem persists, you should consider updating it to the latest available version.
But how can you perform a BIOS update when you can’t boot your computer?
The easy way is, if you have a CPU with integrated graphics, to remove the GPU, plug your monitor into the onboard graphics and start the computer. And while it is booting, you can update the BIOS.
If you don’t have an integrated GPU, then read this guide cause it is a little more complicated, and we would probably need an entire article to discuss it.
Conclusion
I know it has been a long one, but there was a lot to cover. We have talked not only about what the motherboard VGA light means but also about a step-by-step troubleshooting guide that you can use to fix the problem yourself.
I hope I have helped you with a problem, and I would like to hear in the comments section what did the trick for you. Was it one of the hardware issues I have discussed above, was it updating BIOS or something else?

![Logic Board vs Motherboard [Explained] 14 Logic Board vs Motherboard](https://pcexplorers.com/wp-content/uploads/2024/10/Logic-Board-vs-Motherboard-150x150.webp)
